My Top Tips For Taking Insta-worthy Selfies!
Hey there! Is curating your Insta-feed super important? Then you likely want to fill it with images of you and your friends looking their best. I know how hard it can be to get Insta-worthy selfies! I often see a lot of selfies that could be much improved with just a few simple adjustments! These tips + tricks are easy to remember and use once you get the hang of them. With a little practice, they will become second nature to you every time you pull out your cell phone. I’ll explain 5 of my top tips for taking Insta-worthy selfies below, so read on to up-level your selfie game!
Tip #1: Hold your cell phone at an angle slightly higher than your eyes.
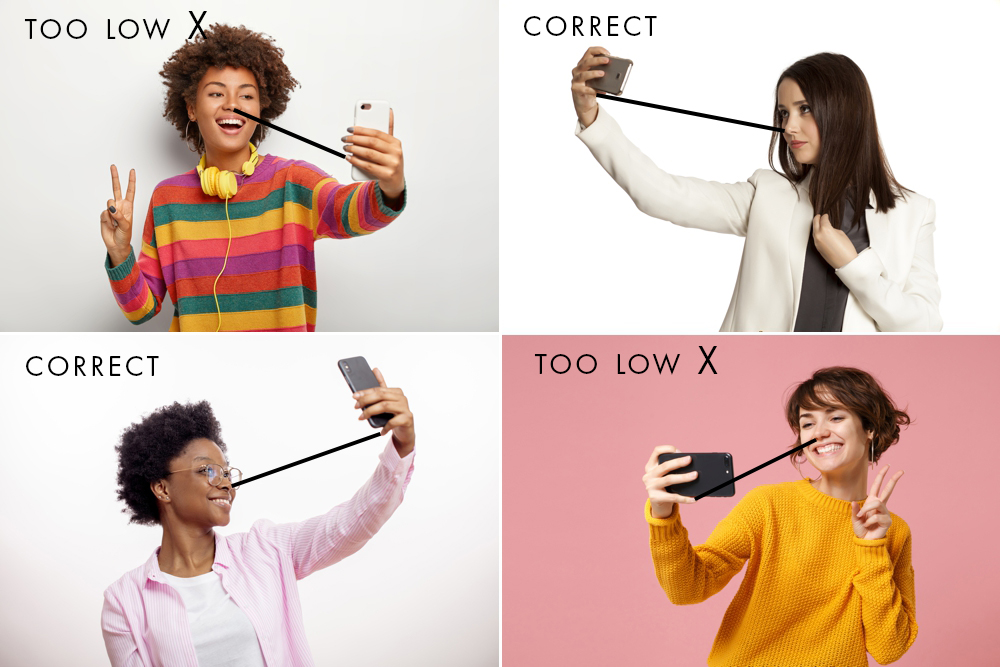
You may already know this trick, but even a tiny little adjustment can make a huge difference in making you look your best. When taking a selfie, pay attention to your angles. Make sure that your outstretched arm is at an angle where you can draw a straight line from your pinky finger to the tip of your nose. The straight line should be slightly angled up…never down! There is definitely a “sweet spot” for this technique. Too low and you will be at an unflattering angle. This will make your neck look bigger and/or shoot up your nostrils. Too high and you will be all forehead. To practice this technique, slightly move your arm up and down and watch your screen to see which position looks best for you!
Tip #2: Tilt (slightly) towards the camera

This tip is one of my top tips for taking Insta-worthy selfies! It will help position your body in a flattering angle so that you look your thinnest. This trick works on all body types and is one I use all the time when photographing. This works best when you are facing to the side. To do this effectively, slightly tip your front shoulder towards the camera. It will likely feel weird, but it works and looks great! If you are the person pressing the button, and facing to the side has you all twisty like a pretzel, don’t worry. You can also accomplish a similar effect when facing the camera. Again, play around with this and see for yourself!
All About Light
Now that you know how to position yourself and the camera at the proper angles so that you look your best, let’s talk for a moment about light. Did you ever take a selfie and notice that you have shadows under your eyes? Do your eyes look like two dark holes? Is your background exposed correctly, but you and your friends are in shadows so that you can barely make out your faces?
If so, your problem centers around controlling the light. You CAN turn on your flash to fix these problems, but the problem with the flash on your camera is that it is a tiny point of light. Tiny light sources can often look harsh and create bright spots of light on your skin (hot spots). In the case of selfies, natural light is always ideal because it creates a much softer, more flattering light…IF you know how to work with natural light properly. The tips that follow will give you some basic pointers on how to use natural light to your advantage.
Tip #3: Position the sun behind you.
Even on a cloudy day when the sun isn’t a bright glowing ball in the sky, it is still there behind a cloud. Find the sun (look for the brightest part of the sky) and place your back to it. On a bright sunny day, this will minimize shadows under your eyes & keep you from squinting. It can also give you a beautiful golden glow around the edges of your hair.
Tip #4: But…Keep it out of your camera frame!
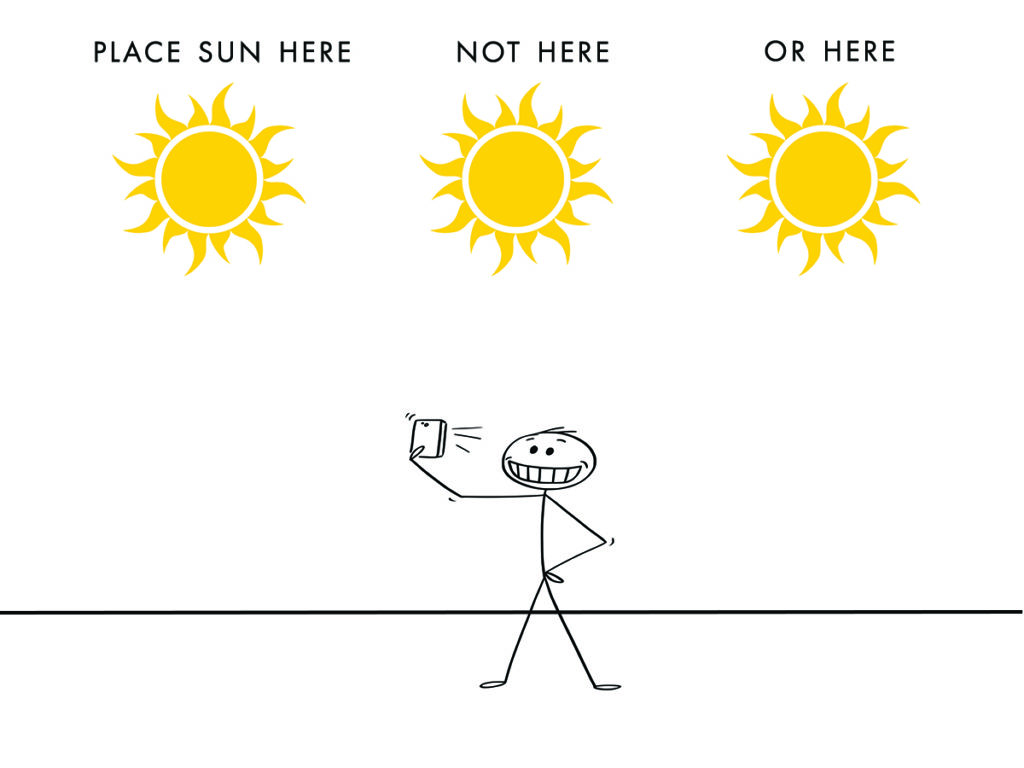
Yes, you want the sun behind you as I mentioned in Tip #3, but you want to make sure that you can’t see it in your camera. You want it off to one side, if possible. Did you ever take a selfie that was hazy and looked like you were standing in a bunch of fog? I’ll bet you that the sun was too close to being in your frame. Again, this technique may take some finessing to get it right. If you can’t see the sun in your camera but are still getting haze in your photo, adjust your position to move the sun further away from your frame. Sunlight can “leak” into an image and cause haze even if you can’t see the sun in your camera.
Tip #5: The Pathway Trick
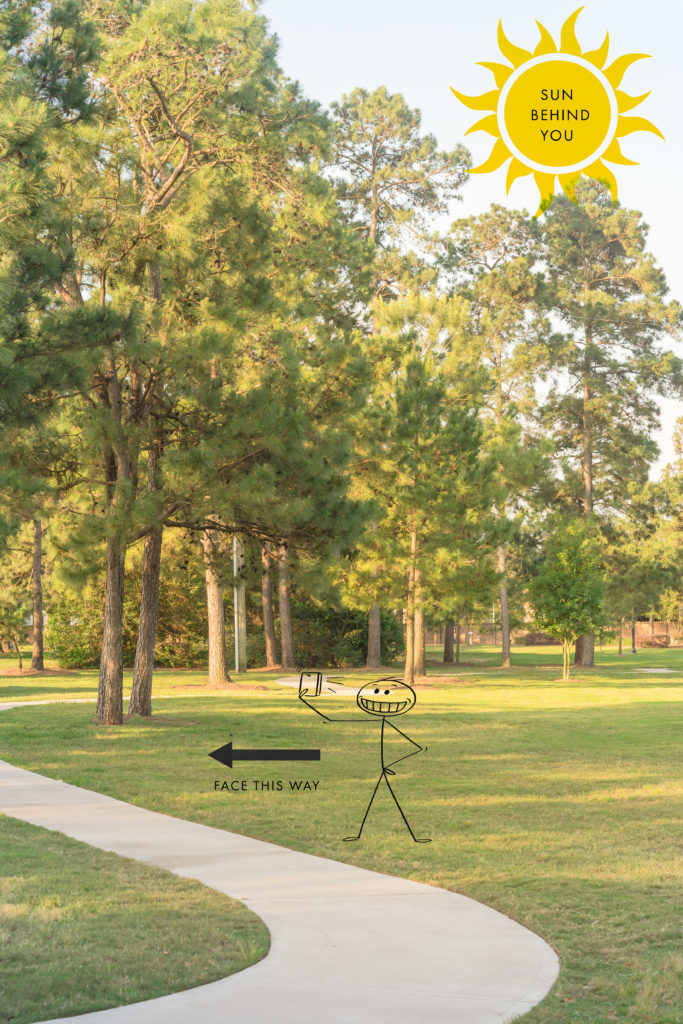
Okay, so the sun is to your back, but how do you light up your front without a flash? Use the “Pathway Trick”! This trick will work with any lightly colored surface such as a gravel or concrete pathway, cement parking lot, or lightly colored patio. You can also lay a white sheet down on the ground in front of you if you have one (because who doesn’t carry a spare white sheet around with them, right?).
Stand at the edge of the lightly colored surface facing it. The idea here is that light surfaces reflect light. When the sun from behind you hits the light surface in front of you, it will “bounce” that light up and onto your face(s). Because the lightly colored area is a larger surface than your camera flash, the light will be soft and flattering. This is how you light up the front of you WITHOUT a flash!
BONUS TIP: Take your selfies during “Golden Hour”.
You may have heard of “Golden Hour” or “glowy light”. This is the time where the sun is lower in the sky and produces a beautiful golden glow. This typically occurs about 1 hour before sunset. If you look outside at this time you can actually see that the trees and grass have a warm golden glow to them. I photograph all of my sessions to end during “Golden Hour” so that we can get some images with that golden glow. They always end up being some of my favorite photos!
I know that some of these tricks may seem complex, but even if you don’t understand the science behind them, they are easy to learn. With a little trial and error, I’m confident that you can master these top tips for taking Insta-worthy selfies and take your selfies from blah to ahhh! I can’t wait to see your images on Insta – feel free to tag @staceylynseniors – I’d be happy to give you some feedback! You can also check out my high school senior galleries to see some of these tips + tricks in action!
